Today 수업내용:
1) 외부Texture를 사용하기 위해 winapi와 DirectX의 차이점 정리
winapi ==blitz를 사용, DirectX ==UVMAPING을 사용
UV = 텍스처의 좌표(TEXCOORD)

(좌표가 반대방향으로 전진하기에 유의해야한다.)
2) Shader
★주의!!(기존의 vertex,pixel.hlsl은 정점으로 이미지를 채웠다면 텍스쳐를 집어넣을땐 UV를 통해 입혀넣는다)
기존의 컬러대신 uv정보를 집어넣는다.
VerTexUV.hlsl
cbuffer WorldBuffer : register(b0)
{
    //matrix world;
    float4x4 world;
}

cbuffer ViewBuffer : register(b1)
{
    matrix view;
}

cbuffer ProjectionBuffer : register(b2)
{
    matrix projection;
}

struct Input
{
    float4 pos : POSITION;
    float2 uv : TEXCOORD;
};

struct Output
{
    float4 pos : SV_POSITION;
    float2 uv : TEXCOORD;
};

Output VS(Input input)
{
    Output output;
    output.pos = mul(input.pos, world);
    output.pos = mul(output.pos, view);
    output.pos = mul(output.pos, projection);

    output.uv = input.uv;

    return output;
}
PixelUV
struct Input
{
    float4 pos : SV_POSITION;
    float2 uv : TEXCOORD;
};

cbuffer ColorBuffer : register(b0)
{
    float4 color;
}

Texture2D map : register(t0);
SamplerState samp : register(s0);

float4 PS(Input input) : SV_TARGET
{
    float4 baseColor = map.Sample(samp, input.uv);

    return baseColor * color;
}
Texture2D map : register(t0);
map:텍스쳐의2D로 구성된 배열이라 생각하면된다.
SamplerState samp : register(s0);
VerTexLayOut 수정
......................아래 추가


struct VertexUV
{
    Float3 pos;
    Float2 uv;

    VertexUV(float x = 0.0f, float y = 0.0f, float u = 0.0f, float v = 0.0f)
        : pos(x, y, 0.0f), uv(u, v)
    {
    }
};
기존코드의 Pixel.hlsl.대신 PixelUV.hlsl을 사용할거라 수정해야함.
Material.h
----
Material();
Material(wstring textureFile, wstring shaderFile = L"PixelUV.hlsl");

-----
cpp

Material::Material()
{
	vertexShader = Shader::AddVS(L"VertexUV.hlsl");
	pixelShader = Shader::AddPS(L"PixelUV.hlsl");
}

Material::Material(wstring textureFile, wstring shaderFile)
{
	vertexShader = Shader::AddVS(L"VertexUV.hlsl");
	pixelShader = Shader::AddPS(shaderFile);

	texture = Texture::Add(textureFile);
}

====================
quad.h

protected:
	Material* material;
	Mesh<VertexUV>* mesh;

	MatrixBuffer* worldBuffer;
	ColorBuffer* colorBuffer;

	Vector2 size;

========================
cpp

Quad::Quad(Vector2 size) : size(size)
{
	tag = "Quad";

	material = new Material();

	mesh = new Mesh<VertexUV>();
	MakeMesh();
	mesh->CreateMesh();

	colorBuffer = new ColorBuffer();
	worldBuffer = new MatrixBuffer();
}

Quad::Quad(wstring textureFile)
{
	tag = "Quad";

	material = new Material(textureFile);
	size = material->GetTexture()->GetSize();

	mesh = new Mesh<VertexUV>();
	MakeMesh();
	mesh->CreateMesh();

	colorBuffer = new ColorBuffer();
	worldBuffer = new MatrixBuffer();
}

void Quad::MakeMesh()
{
	float left = -size.x * 0.5f;
	float right = +size.x * 0.5f;
	float top = +size.y * 0.5f;
	float bottom = -size.y * 0.5f;

	vector<VertexUV>& vertices = mesh->GetVertices();

	vertices.emplace_back(left, top, 0, 0);
	vertices.emplace_back(right, top, 1, 0);
	vertices.emplace_back(left, bottom, 0, 1);
	vertices.emplace_back(right, bottom, 1, 1);

	vector<UINT>& indices = mesh->GetIndices();

	indices = { 0, 1, 2, 2, 1, 3 };
}
+ 텍스쳐를 로드하면 쉐이더에 넘겨줘야하기때문에 view(srv)를 추가해줘야함
+Envirment에서 samplerState 기본값을 설정해줘야한다.
void Environment::CreateSamplerState()
{
	D3D11_SAMPLER_DESC desc = {};
	desc.Filter = D3D11_FILTER_MIN_MAG_MIP_POINT;
	desc.AddressU = D3D11_TEXTURE_ADDRESS_WRAP;
	desc.AddressV = D3D11_TEXTURE_ADDRESS_WRAP;
	desc.AddressW = D3D11_TEXTURE_ADDRESS_WRAP;
	desc.ComparisonFunc = D3D11_COMPARISON_NEVER;
	desc.MinLOD = 0;
	desc.MaxLOD = D3D11_FLOAT32_MAX;
	//LOD(Level Of Detail) : 카메라와의 거리에 따라서 퀄리티를 나누는 기술

	DEVICE->CreateSamplerState(&desc, &samplerState);

	DC->PSSetSamplers(0, 1, &samplerState);
}
3) 텍스쳐필터링
(point, linear 두 방법 point ==ui, 2 D ,dot 이미지에 사용 , linear==3D에 사용,선형보간이기에 가운데값을 그라데이션처럼 보간해버린다.)
4) LoD (level of detail)
:카메라와의 거리에따라 퀄리티를 나누는 기술
즉 멀어졌을때는 모델을 로우폴리곤으로 바꾸어버리고 가까워졌을때는 하이폴리곤으로 세세하게
표현할 수 있게할 수 있는 기법
5) ScratchImage
사용할 때 이동생성자를 통해 생성
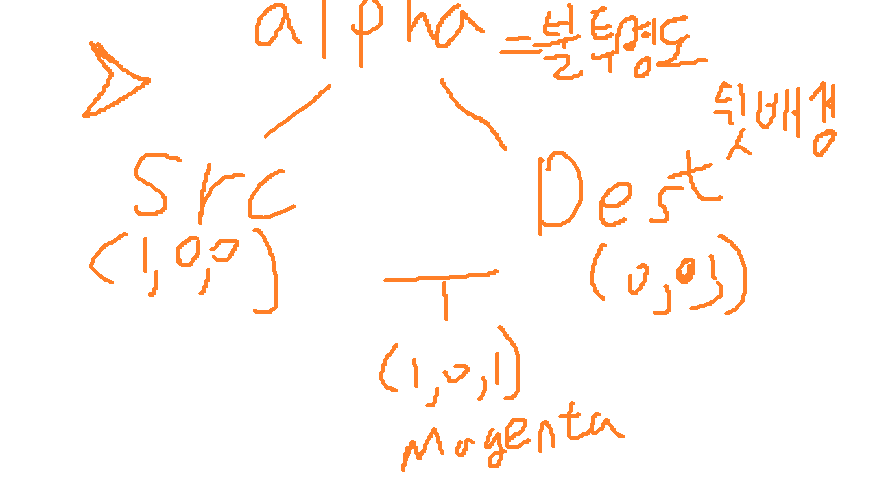
6) CreateBlendState ( 사용하면 알파값을 삭제 / 추가 할수 있다 )
++SRCBLEND
++DESTBLEND
++BLENDOP
void Environment::CreateBlendState()
{
	D3D11_BLEND_DESC desc = {};
	desc.RenderTarget[0].BlendEnable = true;
	desc.RenderTarget[0].SrcBlend = D3D11_BLEND_SRC_ALPHA;
	desc.RenderTarget[0].DestBlend = D3D11_BLEND_INV_SRC_ALPHA;
	//desc.RenderTarget[0].DestBlend = D3D11_BLEND_ONE;
	desc.RenderTarget[0].BlendOp = D3D11_BLEND_OP_ADD;

	desc.RenderTarget[0].SrcBlendAlpha = D3D11_BLEND_SRC_ALPHA;
	desc.RenderTarget[0].DestBlendAlpha = D3D11_BLEND_INV_SRC_ALPHA;
	desc.RenderTarget[0].BlendOpAlpha = D3D11_BLEND_OP_ADD;

	desc.RenderTarget[0].RenderTargetWriteMask = D3D11_COLOR_WRITE_ENABLE_ALL;

	DEVICE->CreateBlendState(&desc, &blendState);

	float blendFactor[4] = {};
	DC->OMSetBlendState(blendState, blendFactor, 0xffffffff);
}
7) Textures
헤더파일
#pragma once

class Texture
{
private:
Texture(ID3D11ShaderResourceView* srv, ScratchImage& image, wstring file);
~Texture();

public:
void PSSet(UINT slot = 0);

Vector2 GetSize()
{
return Vector2(image.GetMetadata().width, image.GetMetadata().height);
}

public:
static Texture* Add(wstring file);

static void Delete();

private:
wstring file;

ScratchImage image;
ID3D11ShaderResourceView* srv;

static unordered_map<wstring, Texture*> textures;
};
cpp 파일
#include "Framework.h"

unordered_map<wstring, Texture*> Texture::textures;

Texture::Texture(ID3D11ShaderResourceView* srv, ScratchImage& image, wstring file)
    : srv(srv), image(move(image)), file(file)
{
}

Texture::~Texture()
{
    srv->Release();
}

void Texture::PSSet(UINT slot)
{
    DC->PSSetShaderResources(slot, 1, &srv);
}

Texture* Texture::Add(wstring file)
{
    if (textures.count(file) > 0)
        return textures[file];

    ScratchImage image;
    LoadFromWICFile(file.c_str(), WIC_FLAGS_NONE, nullptr, image);

    ID3D11ShaderResourceView* srv;

    CreateShaderResourceView(DEVICE, image.GetImages(), image.GetImageCount(),
        image.GetMetadata(), &srv);

    textures[file] = new Texture(srv, image, file);

    return textures[file];
}

void Texture::Delete()
{
    for (pair<wstring, Texture*> texture : textures)
        delete texture.second;
}
8) 행렬의 원소들이 나타내는 정보

9) 피봇(기준점)
기준점을 중심으로 돌게끔 만드는(공전,자전) 기능
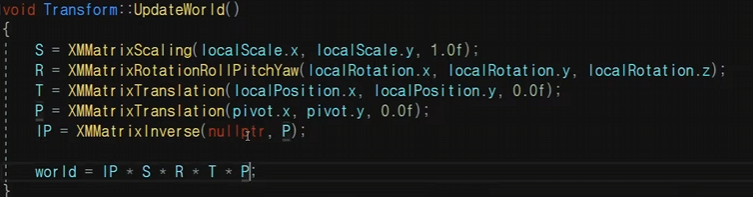
10) Parent
transform.h파일
Transform();
~Transform() = default;
void UpdateWorld();
void Translate(Vector2 direction) { localPosition += direction; }
Vector2 GetRight() { return right.Normalized(); }
Vector2 GetLeft() { return right.Normalized() * -1.0f; }
Vector2 GetUp() { return up.Normalized(); }
Vector2 GetDown() { return up.Normalized() * -1.0f; }
void SetLocalPosition(Vector2 pos) { localPosition = pos; }
void SetLocalRotation(float x, float y, float z) { localRotation = { x, y, z }; }
void SetLocalScale(Vector2 scale) { localScale = scale; }
void SetPivot(Vector2 pivot) { this->pivot = pivot; }
void SetParent(Transform* transform) { parent = transform; }
만들어주고 위의 업데이트 월드에서 parent를 곱해주면 부모의 위치를 따라다니게된다.

++ 추가 공부할내용
1) 게임코딩에서의 외적 활용
내적은 앞 ,뒤 를 판별할때 사용하며 교환법칙이 성립 물체가 자신의 앞인지 뒤인지를 확인할때 쓰인다.
반면 외적은 좌/우 를 판별할때 쓰인다.교환법칙이 성립되지않는다


비행기가 전진하는 방향(우리는 GetRight로 설정하였다) 과 비행기와 적의 방향(하늘색)의 방향을 비교해서
적이 우측에 있다면 양수의 z축 방향으로 회전하게,
적이 좌측에 있다면 음수의 z축 방향으로 회전하게 설정해준다
위의 그림은 적이 오른쪽에 있기때문에 양수로 적용한다.
왼쪽은 음수
과제:
벡터 외적 활용하기
1)플레이어가 자동 으로 가장가까운 적 쪽으로 회전해서 총쏘기
내적을 안해서 뒤에 있는 적을 조준할 때 약간멍청하게 조준하는거같다
2)비행기가 태양으로, 주변을 도는 물체(지구)와 그 물체를 도는 도구(달) 구현하기
SCENE 코드
void ShootingGameScene::SetPlanet()
{
		z += DELTA * 4.0f;
		cursor->SetLocalRotation(0.0f, 0.0f, z);

		cursor->UpdateWorld();


		z += DELTA * 2.0f;
		moon->SetLocalRotation(0.0f, 0.0f, z);

		moon->UpdateWorld();


}
Plane코드(근접한적 자동회전)
void Plane::AutoRotation()
{
    Quad* target = EnemyManager::Get()->GetClosestEnemy(localPosition);

    if (target == nullptr)
        return;
	direction = target->GetLocalPosition() - localPosition;
    float cross = Vector2::Cross(GetRight(), direction);

    if (cross> 0)
    {
        localRotation.z += direction.Angle() * DELTA;
    }
    else if(cross<0)
    {
        localRotation.z -= direction.Angle() * DELTA;
    }
}
enemyManager코드(근접적코드)
Quad* EnemyManager::GetClosestEnemy(Vector2 pos)
{
	float minDistance = FLT_MAX;
	Quad* selectEnemy = nullptr;

	for (Enemy* enemy : enemies)
	{
		if (!enemy->IsActive()) continue;

		float distance = (enemy->GetLocalPosition() - pos).SqrMagnitude();

		if (minDistance > distance)
		{
			minDistance = distance;
			selectEnemy = enemy;
		}
	}

	return selectEnemy;
}
'개인공부 > DirectX' 카테고리의 다른 글
| DirectX8일차_RectCollision (0) | 2024.03.07 |
|---|---|
| DirectX 7일차 _Collision (0) | 2024.03.06 |
| DirectX 5일차 (0) | 2024.03.04 |
| DirectX 4일차 (2) | 2024.03.04 |
| DirectX 1일 (0) | 2024.02.26 |


